This method requires a dough hook attachment and a mixing bowl.
Ingredients are combined in the bowl, and the stand mixer is set on low to mix initially.
After a minute or two, the speed can be increased.
Mixing for 5-7 minutes usually achieves the same results as hand-kneading.
The mixer handles the labor, allowing the baker to focus on texture and consistency.
Points to consider:
Moisture: Adjust the water and flour based on humidity.
Speed Settings: Start slow to avoid splatter.
Monitoring: Periodically check the dough’s texture during the process.
Using a stand mixer offers efficiency and consistency in kneading.
First Rise
The first rise is a crucial stage in the bread-making process.
It allows the dough to develop flavor and structure.
Proper conditions enhance yeast activity, vital for achieving a good rise.
Finding the Perfect Spot for Rising
Selecting an ideal location for dough rising significantly impacts yeast performance.
The dough requires a warm and draft-free environment to rise effectively.
Recommended temperatures:
Ideal range: 75°F to 85°F (24°C to 29°C)
Too cold: Below 70°F (21°C) slows fermentation
Too hot: Above 90°F (32°C) can kill yeast
Some common spots include:
Kitchen counter: Away from drafts and direct sunlight
Oven (turned off): Create warmth by placing a bowl of hot water inside
Microwave: With a cup of hot water to maintain warmth
Covering and Timing the Dough
Proper covering of the dough is essential to prevent it from drying out.
A wet cloth or plastic wrap maintains moisture and warmth during the rise.
Timing is key:
The first rise typically takes 1 to 2 hours, depending on temperature and recipe specifics.
Watch for visual cues: the dough should double in size.
To check readiness, gently press a finger into the dough.
If the indentation remains, it’s ready for the next step.
If it springs back, allow more time for rising.
Shaping the Dough
Properly shaping the dough is crucial for achieving the desired final texture and appearance in homemade bread.
This process involves forming the dough into specific shapes and ensuring uniformity, which ultimately affects the baking results.
Forming the Basic Shapes
To begin shaping the dough, the baker first turns the risen dough out onto a lightly floured surface.
They then gently press it down to remove excess air.
The dough can be shaped into various forms such as loaves, rolls, or baguettes.
Basic Shaping Techniques:
Round Loaf: Gather the edges towards the center, flip the dough seam side down, and gently rotate it with hands to create tension.
Baguette: Flatten the dough, then fold it over itself several times, tapering the ends to achieve a long, cylindrical shape.
Using a bench scraper can assist in dividing the dough into portions before shaping.
Ensuring Evenness and Symmetry
After forming the desired shape, attention must be paid to evenness and symmetry.
This ensures uniform baking and improves the bread’s presentation.
The baker should inspect the dough for consistent size and shape.
To achieve this:
Work Gently: Avoid pressing out too much air to retain the dough’s structure.
Tension Building: While shaping, apply light pressure to create surface tension, which supports an even rise.
Utilizing a ruler can help check the dimensions, ensuring each piece of dough is uniform.
Properly shaped dough will provide a better texture and more appealing final product.
Second Rise and Proofing
The second rise, also known as proofing, is a crucial step in bread-making.
It allows the dough to develop more flavor and texture.
Proper technique ensures an even rise and final structure.
Preparing for the Second Rise
After the first rise, the dough must be gently deflated and shaped.
This removes excess gas and redistributes the yeast.
The dough should be placed in a lightly floured area.
Next, the baker can shape the dough into the desired form, whether it be a loaf, roll, or baguette.
The shaped dough needs to rest for 10-15 minutes.
This allows the gluten to relax, making it easier to shape.
Once shaped, the dough should be placed in a prepared baking pan or on a baking sheet.
Cover it with a damp cloth or plastic wrap to maintain moisture.
The ideal environment for this rise is a warm, draft-free area.
Troubleshooting Uneven Rises
Uneven rises can be frustrating.
Several factors may contribute to this issue.
One common cause is improper shaping, which can trap air pockets in the dough.
Another reason might be an unbalanced dough temperature.
Ideally, it should be around room temperature when proofing.
If the dough is too cold, it may not rise correctly.
Bakers should also monitor their proofing time.
Under-proofed dough will collapse when baked, while over-proofed dough may become slack.
Timing is critical; using a finger poke test can help determine readiness.
If the dough springs back slowly, it’s ready for baking.
Preheating the Oven
Preheating the oven is an essential step in making bread at home.
Proper temperature and timing ensure even baking and the best texture in the finished loaf.
Understanding how to effectively preheat can significantly impact the quality of the bread.
Understanding Oven Temperatures
Temperature plays a critical role in bread baking.
Most bread recipes require ovens to be set between 350°F (175°C) and 475°F (245°C).
For example:
450°F (232°C) is optimal for crusty Artisan breads.
350°F (175°C) is suitable for softer enriched doughs.
It’s important to use an oven thermometer to verify the actual temperature.
Some ovens may display inaccurate temperatures.
Adjusting settings accordingly prevents undercooking or overbaking.
Understanding the specific temperature required in a recipe can enhance results.
Additionally, using the right method—convection versus conventional—can affect the outcome.
A convection oven may require a lower temperature due to more even heat distribution.
Timing the Preheating
Timing is key when preheating the oven.
It typically takes 15 to 20 minutes to reach the desired temperature.
To avoid starting the baking process prematurely, one should:
Start preheating before preparing the dough.
Check the oven’s progress with a thermometer.
For recipes that require a specific temperature, it’s advised to wait until the oven has stabilized.
Opening the door frequently during preheating can lower the temperature and lead to uneven baking.
Once the thermostat indicates the desired temperature, it’s crucial to allow a few extra minutes.
This ensures even heat throughout the oven, which is fundamental for even bread baking.
Baking the Bread
The baking process is crucial for achieving a perfect loaf.
Proper placement in the oven, careful monitoring, and testing for doneness ensure the bread rises and develops the desired crust and texture.
Placing the Dough in the Oven
It is essential to preheat the oven, typically to a temperature between 375°F and 450°F, depending on the recipe.
A hot oven ensures that the bread begins baking immediately, promoting a good rise.
Before placing the dough in the oven, use parchment paper or a sprinkle of flour on the baking surface to prevent sticking.
For added steam, pour a cup of water into a baking dish placed at the bottom of the oven.
This moisture helps create a crusty exterior.
Carefully place the dough in the center of the oven for even heat distribution.
Avoid opening the oven door frequently, as this can lead to temperature fluctuations.
Monitoring the Baking Process
During baking, keeping an eye on the bread is essential.
Set a timer according to the recommended baking time, but start checking a few minutes earlier to prevent over-baking.
Visual cues are important.
The bread should turn a golden brown color, and its aroma will fill the kitchen.
If the top is browning too quickly, cover it loosely with aluminum foil to shield it from direct heat.
Maintaining an even oven temperature is key.
If the oven has hot spots, rotate the bread halfway through the baking time to ensure uniform cooking.
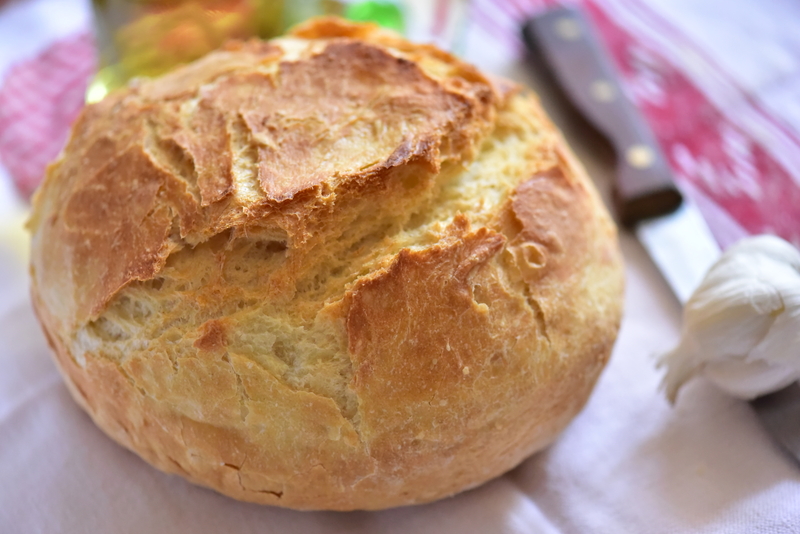
Testing for Doneness
To determine if the bread is fully baked, there are a few reliable methods.
The most common technique is the thump test: gently tap the bottom of the loaf.
A hollow sound indicates doneness.
Another method involves using a thermometer.
Insert it into the center of the bread.
An internal temperature of 190°F to 210°F typically signals that it is done.
For added certainty, slice into the bread and examine the inside.
A fully baked loaf will have a moist, airy crumb without doughy spots.
Once satisfied with the results, remove the bread from the oven and let it cool on a wire rack.
Cooling and Storing
Proper cooling and storage are essential to maintain the quality and freshness of homemade bread.
Following the right practices ensures that the bread retains its flavor, texture, and moisture level for as long as possible.
Optimal Cooling Practices
Cooling bread correctly is critical to prevent sogginess and maintain a crusty exterior.
Once removed from the oven, the bread should be placed on a wire rack.
This allows air to circulate around the loaf, preventing steam buildup.
Key Points for Cooling:
Time: Allow the bread to cool for at least 30 minutes.
Temperature: Room temperature is ideal; avoid covering the bread during this time.
Texture Consideration: A properly cooled loaf will have a firmer crust and a tender crumb.
Ensuring proper cooling before storage enhances the bread’s longevity and taste.
Best Methods for Storage
Once cooled, the bread can be stored to preserve its quality. The best storage method depends on the intended duration before use.
Short-Term Storage:
Plastic Bag: Place the bread in a plastic bag. Squeeze out excess air and seal it tightly. This method keeps the bread soft but may soften the crust.
Razab Glass Loaf Pan: Alternatively, you can store the bread directly in this Glass Loaf Pan with Lids. These airtight, BPA-free pans are perfect for keeping your bread fresh, and the secure lids ensure that the crust stays firm.
Long-Term Storage:
Freezing: Wrap the bread tightly in plastic wrap, followed by aluminum foil. Label with the date. This method preserves the bread for up to three months.
Thawing: To thaw, leave the wrapped bread at room temperature or use a microwave’s defrost setting.
Choosing the right storage method based on consumption timeline helps maintain the bread’s desired texture and flavor.
Serving Suggestions
Freshly baked bread can elevate a meal or snack with the right pairings and serving techniques.
From complementing flavors to creative presentations, there are numerous ways to enjoy homemade bread.
Pairing with Other Foods
Homemade bread works well with a variety of foods.
Here are some suggestions:
Soups and Stews: Thick, hearty soups like minestrone or beef stew are perfect companions. A slice of rustic bread enhances the meal and provides a means to soak up any remaining broth.
Cheese and Charcuterie: A platter of assorted cheeses and cured meats pairs beautifully with soft, crusty bread. Choose cheeses like Brie or Goat cheese for a delightful contrast.
Dips: Hummus, tapenade, or spinach-artichoke dip can be deliciously served alongside slices of bread for a satisfying appetizer.
Salads: Stripped-down salads such as Caprese or Caesar come with the option of serving bread on the side. The bread balances the lightness of the salad.
Creative Serving Techniques
Serving bread doesn’t have to be straightforward.
Here are innovative ideas to consider:
Bread Bowls: Hollow out small round loaves for soup or salad servings. This adds visual appeal and a unique element.
Slices with Toppings: Offer an assortment of toppings like flavored butters, spreads, or seasonal vegetables on toasted slices. This makes for an engaging experience and encourages creativity in flavor combinations.
Breadstick Arrangements: Shape bread dough into sticks and bake. Present them in a tall glass for a decorative side item.
Garnishing: Dust loaves with flour or sprinkle herbs on top before baking. This adds an aesthetic touch that enhances presentation.
These serving suggestions will enhance the experience of enjoying homemade bread in various settings.


 Mixing ingredients is a critical step in the bread-making process.
  Kneading dough is a crucial step in bread-making.
  The first rise is a crucial stage in the bread-making process.

 Preheating the oven is an essential step in making bread at home.
 Proper cooling and storage are essential to maintain the quality and freshness of homemade bread.
  Freshly baked bread can elevate a meal or snack with the right pairings and serving techniques.


