What Temperature Do You Bake Puff Pastry? A Guide to Perfect Results
Puff pastry creates those beautiful, flaky layers that make pastries irresistible, but getting it right depends on using the correct oven temperature.
The best temperature for baking puff pastry is between 375°F and 400°F, which allows the butter layers to create steam and separate properly while achieving a golden, crispy finish.
Too low and your pastry stays flat and soggy. Too high and the outside burns before the inside cooks through.
Getting the temperature right is just one part of working with this delicate dough. You need to understand how puff pastry works, why the layers matter, and what mistakes cause problems. The type of puff pastry you use also affects your results, whether you’re working with homemade dough or a frozen store-bought sheet.
This guide walks you through everything you need to know about baking puff pastry successfully. You’ll learn the basics of how the dough is made, how to prepare it properly, and the techniques that separate perfect pastries from disappointing ones. You’ll also discover how to store your creations so they stay fresh and crispy.
Fundamentals of Puff Pastry and Laminated Dough
Puff pastry gets its signature rise and flaky texture from a laminated dough structure made by folding butter between thin layers of dough. The quality of your ingredients and how well you create these layers directly impacts how your pastry bakes at high temperatures.
Defining Puff Pastry and Its Uses
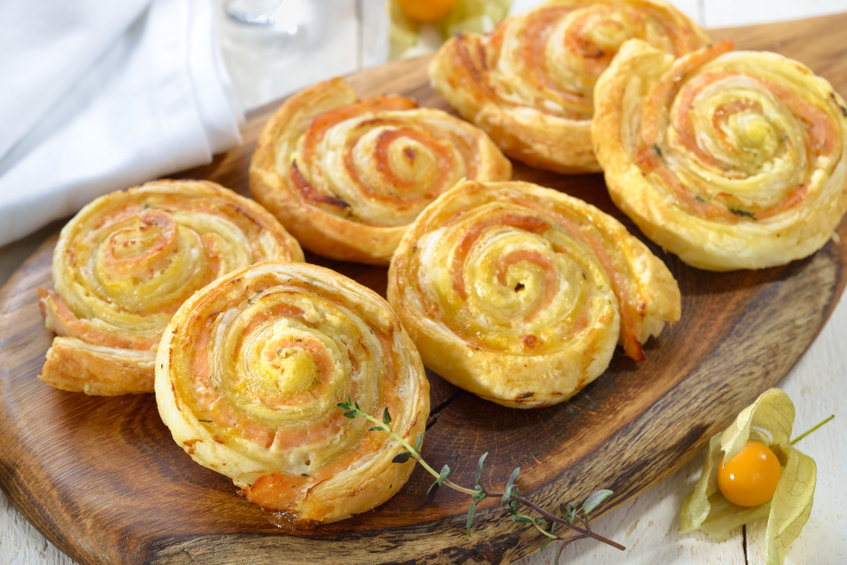
Puff pastry is a light, flaky pastry made through a specific folding technique that creates hundreds of thin, buttery layers. When you bake it at the right temperature, the butter melts and produces steam that forces the layers apart, causing the dough to expand dramatically.
You can use puff pastry for both sweet and savory dishes. Sweet applications include fruit tarts, palmiers, napoleons, and turnovers. For savory cooking, it works perfectly in cheese straws, sausage rolls, pot pies, and beef wellington.
Store-bought puff pastry saves time and often uses vegetable shortening instead of butter. Homemade versions use real butter, which gives you richer flavor but requires more skill and time to prepare. The choice between store-bought and homemade depends on your schedule and how much flavor depth you need.
Understanding Laminated Dough Structure
Laminated dough refers to any dough created by repeatedly folding butter into a base dough. This folding process creates distinct layers that separate during baking. Each fold multiplies the number of layers exponentially.
Traditional puff pastry uses a process called turns or folds. You roll out the dough, place a butter block in the center, fold the dough over it, then roll and fold multiple times. Most recipes call for 6 turns, creating over 700 layers.
The layers remain separate because cold butter stays solid between the dough sheets. When heat hits the pastry in your oven, the butter melts quickly and turns to steam. This steam pushes the layers apart before the dough structure sets, giving you that characteristic puffed appearance.
Key Ingredients Affecting Baking Success
Butter quality matters more than almost any other factor in puff pastry. European-style butter with higher fat content (82-84% versus 80%) creates better layers and superior flavor. The butter must stay cold during preparation to maintain layer separation.
Your flour choice impacts structure development. All-purpose flour works well for most recipes, providing enough protein for structure without making the pastry tough. Too much protein creates a chewy texture instead of flaky layers.
Water content affects how your dough handles and bakes. Too much water makes the dough sticky and hard to work with. Too little prevents proper gluten development, causing layers to break apart. Salt enhances flavor but doesn’t significantly impact the baking temperature you’ll need.
Types of Puff Pastry: Homemade, Store-Bought, and Frozen
Puff pastry comes in three main forms: homemade (traditional or quick), store-bought fresh, and frozen varieties. Each type has different ingredients, preparation methods, and baking considerations that affect your final results.
Traditional vs. Quick Puff Pastry
Traditional puff pastry requires multiple folds and turns to create hundreds of delicate layers. You make it by encasing butter in dough, then folding and rolling it six times over several hours. This method produces the most layers and the best rise when baked.
Quick puff pastry (also called rough puff) skips the precise folding technique. You cut butter into flour, then fold the dough just three or four times. This method takes about an hour instead of several and still creates good layers, though not as many as traditional puff pastry.
Both types need the same baking temperature of 400°F to create steam between the layers. Traditional puff pastry rises higher and creates more dramatic puffs. Quick puff pastry works well for rustic tarts and pot pies where extreme height isn’t critical.
Choosing Between Homemade and Store-Bought Options
Store-bought puff pastry saves you hours of work and delivers solid results for everyday baking. You’ll find it in the freezer section at most grocery stores. Some brands use butter while others use vegetable shortening or palm oil, which changes the flavor significantly.
Butter-based brands taste richer and more authentic. Shortening-based options cost less but lack depth of flavor. Always check the ingredients list before buying.
Homemade puff pastry gives you complete control over ingredients and produces superior flavor when made with quality butter. You’ll invest 3-4 hours for traditional puff pastry or about 1 hour for quick puff pastry. The effort pays off when you want the best possible taste or need to practice your baking skills.
For special occasions or when flavor matters most, homemade wins. For weeknight dinners or quick appetizers, store-bought works perfectly fine.
Evaluating Frozen Puff Pastry Varieties
Frozen puff pastry comes in sheets or shells. Sheets give you flexibility to cut any shape you need. Shells come pre-formed for specific uses like vol-au-vents or pastry cups.
You must thaw frozen puff pastry before using it. Leave it in the refrigerator for 3-4 hours or at room temperature for 30-40 minutes. Never microwave it or the butter will melt unevenly.
Frozen sheets typically bake at 425°F, slightly higher than homemade puff pastry. This temperature compensates for the commercial production methods and helps create the steam needed for proper puffing. Quality frozen brands like Dufour use all-butter recipes and perform nearly as well as homemade versions.
Check for ice crystals in the package before buying. Too many crystals indicate the pastry went through freeze-thaw cycles, which damages the layers and prevents proper rising.
Preparation Essentials Before Baking
Getting your puff pastry ready before it goes in the oven makes the difference between crispy, flaky layers and a soggy mess. Proper thawing, rolling, and chilling keep the butter cold and the layers distinct.
Thawing Frozen Puff Pastry Safely
You need to thaw frozen puff pastry in the refrigerator for about 4 hours or overnight. This slow thawing process keeps the butter between the layers solid while making the dough workable.
Never thaw puff pastry at room temperature or in the microwave. Fast thawing melts the butter and creates a sticky, unworkable dough that won’t puff properly when baked.
The pastry is ready when it unfolds without cracking but still feels cold to the touch. If it becomes too warm or soft while you’re working with it, put it back in the refrigerator for 10-15 minutes.
Rolling Out Puff Pastry for Uniform Results
Start with a lightly floured surface and a cold rolling pin. Roll from the center outward in one direction, rotating the dough 90 degrees after each roll to maintain an even thickness.
Aim for about 1/8 to 1/4 inch thickness for most recipes. Thinner pastry creates more crispness, while thicker pastry gives you a fluffier texture.
Important tips for rolling:
Use gentle, even pressure
Don’t press too hard or you’ll squeeze out the butter
Lift and turn the dough frequently to prevent sticking
Add minimal flour to avoid a tough texture
If the pastry starts sticking or feels warm, slide it onto a baking sheet and refrigerate for 10 minutes.
Chilling and Shaping Tips
After cutting your shapes, chill them on a parchment-lined baking sheet for 20-30 minutes before baking. This firms up the butter layers and helps the pastry hold its shape in the oven.
You can freeze puff pastry shapes for up to 3 months. Place cut shapes on a baking sheet until frozen solid, then transfer to a freezer bag. Bake directly from frozen, adding 2-3 minutes to the baking time.
Use a sharp knife or pastry cutter for clean edges. Dull blades seal the layers together and prevent proper rising. Avoid twisting cookie cutters when cutting shapes.
Optimizing Baking Temperature for Perfect Puff
The best baking temperature for puff pastry falls between 375°F and 400°F (190°C to 200°C), with most recipes performing best at 400°F. Getting the temperature right ensures the butter melts quickly to create steam, which separates the layers and produces that signature flaky texture.
Recommended Temperature Ranges
You should bake puff pastry at 400°F (200°C) for optimal results in most cases. This temperature creates enough heat to melt the butter between layers rapidly, generating the steam needed for proper rise and separation.
For delicate items or pastries with sugar-based toppings, lower your oven to 375°F (190°C). This prevents over-browning on the exterior while the interior finishes baking. Some bakers push the temperature to 425°F (220°C) for very thin pastries that need quick crisping, but this requires careful monitoring.
Your oven’s accuracy matters more than you might think. Many ovens run 25°F hotter or cooler than their display shows. Use an oven thermometer to verify the actual temperature inside your oven. This small tool prevents underbaked or burnt pastry and takes the guesswork out of timing.
Dark-colored baking sheets absorb more heat than light ones, which can affect your results. If you’re using a dark pan, reduce your baking temperature by 25°F to prevent the bottom from burning before the top browns properly.
Adjustments for Different Pastry Sizes and Fillings
Larger or thicker puff pastry items need lower temperatures around 375°F to cook through without burning the exterior. A thick beef wellington or large tart requires more time at moderate heat so the filling reaches a safe temperature while the pastry browns evenly.
Smaller items like cheese straws or mini turnovers bake faster at the standard 400°F. Their reduced mass allows heat to penetrate quickly, creating crispy layers in 15-20 minutes.
Wet fillings like fruit compotes or custards require special attention. Bake these at 400°F to set the pastry quickly and prevent soggy bottoms. The higher heat creates a moisture barrier between the filling and dough. For extremely wet fillings, you can start at 425°F for the first 10 minutes, then reduce to 375°F to finish baking without over-browning.
Empty pastry shells (blind baking) work best at 400°F with pie weights or dried beans holding down the dough. This prevents puffing in the center while the edges crisp up.
Why Preheating the Oven Is Critical
Your oven must reach full temperature before the pastry goes in. Preheating for 15-20 minutes ensures even heat distribution throughout the oven cavity. Without proper preheating, your puff pastry enters a cool environment where butter melts slowly instead of creating instant steam.
Cold pastry hitting hot oven air triggers the chemical reaction that makes layers separate. When you skip preheating, the butter gradually melts into the dough instead of vaporizing between layers. This produces a dense, greasy pastry instead of light, flaky layers.
The initial blast of heat sets the structure of your pastry. In the first few minutes of baking, the exterior begins to firm while interior layers are still soft and expanding. If your oven hasn’t reached temperature, this critical phase happens too slowly and unevenly.
Place your baking sheet on the center rack where air circulates best. The center position provides consistent heat from all sides, promoting even rise and uniform browning across your entire batch of pastry.
Techniques and Common Mistakes in Baking Puff Pastry
Proper technique and awareness of common pitfalls make the difference between perfectly flaky layers and disappointing results when you bake puff pastry. Understanding how to handle this laminated dough prevents collapsed layers, soggy bottoms, and uneven browning.
Blind Baking for Pastry Shells
Blind baking prevents soggy bottoms when you bake puff pastry shells for tarts or pies with wet fillings. This technique involves baking the pastry partially or completely before adding the filling.
Line your puff pastry shell with parchment paper and fill it with pie weights, dried beans, or uncooked rice. Bake at 400°F for 15 minutes with the weights in place.
Remove the weights and parchment, then continue baking for 5-8 more minutes until golden brown. The bottom should feel dry and crisp when you touch it lightly.
Dock the pastry with a fork before blind baking if you want a flat base. This creates small holes that let steam escape and prevents puffing. Skip this step if you want the sides to rise and create a natural shell shape.
Avoiding Overworking and Collapsed Layers
Overworking laminated dough destroys the butter layers that create puff pastry’s signature flakiness. Handle the dough as little as possible and keep it cold throughout the process.
Roll in one direction only using firm, even pressure. Avoid pressing down too hard or rolling back and forth, which smears the butter layers together instead of keeping them separate.
Warm hands can melt the butter between layers. Use a light touch and work quickly when you shape your pastry. If the dough starts feeling soft or sticky, refrigerate it for 15-20 minutes before continuing.
Never reroll scraps more than once. The layers become compressed and won’t puff properly. Use first-generation scraps for items where height matters less, like decorative cutouts or cheese straws.
Visual and Texture Cues for Doneness
Color and texture tell you when puff pastry is properly baked. Look for a deep golden brown color across the entire surface, not just light tan.
The pastry should have risen to at least three times its original height. Fully puffed layers create visible separation you can see from the side. If the pastry looks flat or compressed, it needs more time.
Tap the bottom gently with your knuckle. Properly baked puff pastry sounds hollow and feels crisp. Soft or doughy spots mean the interior hasn’t finished baking.
Underbaking is the most common mistake when you bake puff pastry. Pale pastry with a doughy texture will collapse as it cools and taste raw. Keep baking until you see rich browning and crisp layers throughout.
Proper Storage and Freezing for Longevity
Storing puff pastry correctly keeps it fresh and flaky for weeks or months. Freezing works for both unbaked dough and finished pastries, while proper thawing prevents texture problems.
Freezing Unbaked and Baked Puff Pastry
You can freeze puff pastry in both its raw and baked forms. Raw dough should be wrapped tightly in plastic wrap, then placed in a freezer bag to prevent freezer burn. This method keeps the dough fresh for up to 1 month.
Unbaked shaped pastries need to be frozen on a baking sheet first. Once solid, transfer them to an airtight container or freezer bag. This prevents the pieces from sticking together.
Baked pastries also freeze well when cooled completely. Wrap each piece in plastic wrap and aluminum foil to protect the crispy texture. Store these for up to 1 month.
When you’re ready to use frozen baked items, let them thaw at room temperature. Then refresh them in a 350°F oven for 3-5 minutes to restore crispness. Skip the thawing step for unbaked items and bake them straight from frozen, adding a few extra minutes to the cooking time.
Using Thawed Dough Effectively
Thaw frozen puff pastry in the refrigerator for 3-4 hours or overnight. Never thaw it at room temperature, as uneven softening makes the dough sticky and hard to work with.
Your dough should feel cold and pliable when ready. If it’s too soft, chill it for 10-15 minutes before rolling. If it cracks, let it sit for 5 minutes to warm slightly.
Use thawed dough within 24-48 hours for the best results. Don’t refreeze thawed puff pastry, as this damages the butter layers and prevents proper puffing. The dough loses its structure and won’t rise as well in the oven.
For faster thawing, leave the wrapped pastry on your counter for 30-40 minutes. Check it frequently to catch it at the right temperature. Work quickly once it’s thawed to keep the butter layers intact.
FAQ: What Temperature Do You Bake Puff Pastry?
Puff pastry needs high heat to create its signature flaky, layered texture. The correct baking temperature helps the butter release steam, which separates the layers during baking.
What Temperature Do You Bake Puff Pastry At?
Puff pastry is typically baked at 200–220°C (400–425°F) for best rise and flakiness.
Why Does Puff Pastry Need High Heat?
High heat quickly turns the butter’s moisture into steam, which pushes apart the dough layers and creates the puffed texture.
What Happens If Puff Pastry Is Baked Too Cold?
Low temperatures can cause:
Poor rising
Greasy texture
Flat pastry
Less flaky layers
Can Puff Pastry Burn at High Temperatures?
Yes, if baked too long or too close to the heating element, the outer layers may brown too quickly before the center finishes cooking.
How Long Does Puff Pastry Take to Bake?
Most puff pastry recipes bake for 15–25 minutes, depending on size and filling.
Should Puff Pastry Be Golden Brown?
Yes, fully baked puff pastry should appear:
Deep golden brown
Crisp
Light and flaky
Do You Need to Preheat the Oven for Puff Pastry?
Yes, a fully preheated oven is essential to create proper steam and lift immediately after baking begins.
Should Puff Pastry Be Cold Before Baking?
Yes, cold pastry helps keep the butter layers intact, which improves puffing and flakiness.
Can You Bake Puff Pastry With Fillings?
Yes, but wet fillings should be limited because excess moisture can prevent the pastry from becoming crisp.
What Is the Best Rack Position for Puff Pastry?
The middle rack is usually best for even heat circulation and balanced browning.


 Puff pastry gets its signature rise and flaky texture from a laminated dough structure made by folding butter between thin layers of dough. The quality of your ingredients and how well you create these layers directly impacts how your pastry bakes at high temperatures.
 Puff pastry comes in three main forms: homemade (traditional or quick), store-bought fresh, and frozen varieties. Each type has different ingredients, preparation methods, and baking considerations that affect your final results.
 Getting your puff pastry ready before it goes in the oven makes the difference between crispy, flaky layers and a soggy mess. Proper thawing, rolling, and chilling keep the butter cold and the layers distinct.
 The best baking temperature for puff pastry falls between 375°F and 400°F (190°C to 200°C), with most recipes performing best at 400°F. Getting the temperature right ensures the butter melts quickly to create steam, which separates the layers and produces that signature flaky texture.
 Proper technique and awareness of common pitfalls make the difference between perfectly flaky layers and disappointing results when you bake puff pastry. Understanding how to handle this laminated dough prevents collapsed layers, soggy bottoms, and uneven browning.
 Storing puff pastry correctly keeps it fresh and flaky for weeks or months. Freezing works for both unbaked dough and finished pastries, while proper thawing prevents texture problems.
 Puff pastry needs high heat to create its signature flaky, layered texture. The correct baking temperature helps the butter release steam, which separates the layers during baking.


